
Starting a Shopify store is a simple way to launch an online store using an all-in-one suite of eCommerce tools. This 12-step guide explains the process of how to create your own Shopify store from scratch. We take you through creating a Shopify account, customizing your shop with themes and plug-ins, setting up Shopify Payments and shipping, and performing final tests to your online store before launch. We also provide tips on how to optimize your product pages, menus, and important components of your website.
Table of Contents
1. Create a Shopify Account
The first step to starting a Shopify store is to create a Shopify account. Begin by navigating to shopify.com and select a plan that suits your business needs. Shopify offers a range of plans (Basic, Shopify, Advanced), each designed to cater to different sizes and types of businesses.
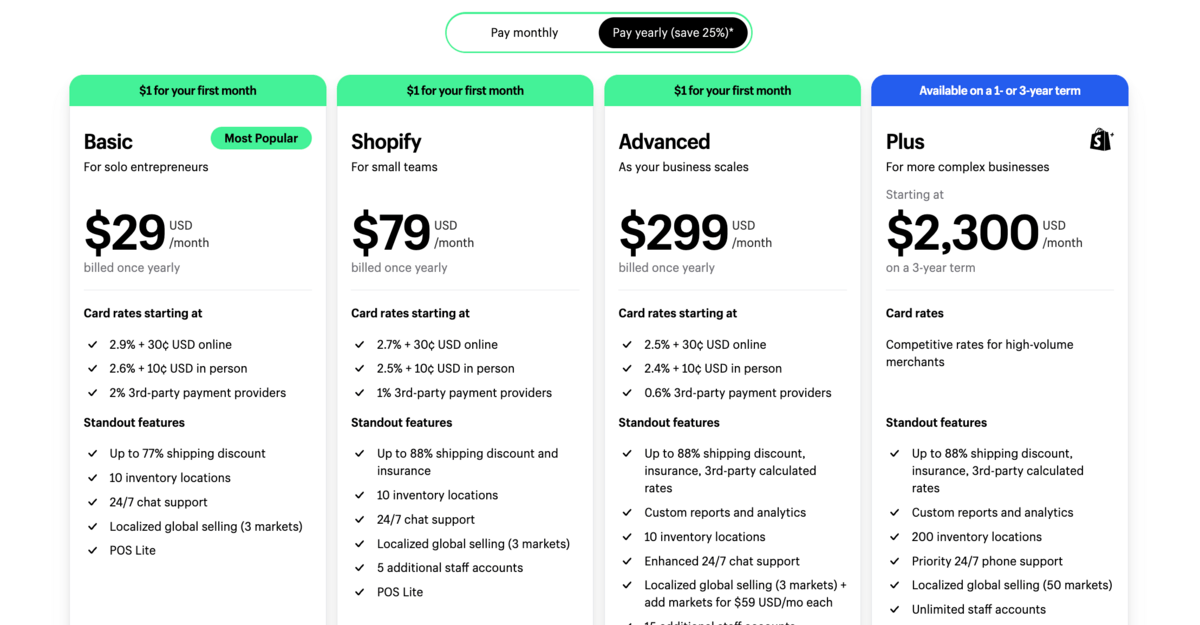
The Basic plan is best for new businesses and offers all the essential features like online store functionality, sales channels, and basic inventory management. The standard Shopify plan works well for established businesses. It provides additional staff accounts, API access for more customizable apps, and lower transaction fees. The Advanced plan is best suited for enterprises. It offers more robust features like detailed analytics, 10x checkout capacity, and enhanced live chat. These upgrades support high-volume merchants aiming for significant growth.
Once you’ve chosen a plan, start your free trial to explore Shopify’s features without any immediate financial commitment. Shopify’s free trial typically lasts for 14 days but certain plans have a 30 day free trial. The trial allows you to set up your shop and familiarize yourself with Shopify’s features and interface.
You’ll undergo an onboarding phase during the sign-up process. This phase guides you through setting up the core aspects of your store, including choosing a store name, setting up domains, and configuring basic settings. After completing the onboarding, you’re provided a guided setup to further assist in the customization of your store. We discuss these steps in detail next.
2. Add Products or Services
The second step is to add the products or services you intend to offer. To begin this process, click on the “Add product” button found within the guided setup. This action opens a new page where you enter detailed information about each item you plan to sell.
There are 6 details to fill in:
Product Title
A product title names your product or service. Make it descriptive and appealing to potential customers.
Product Description
A product description provides detailed and enticing information about your product or service. Highlight key features, benefits, and any unique selling points.
Product Images
Product images must be high-quality and accurately represent the product you’re selling.
Product Pricing
Product pricing must be both competitive and profitable. Consider your costs, market demand, and competitor pricing to determine the most optimal price point.
Product Variant
Product variants, such as sizes, colors, materials, or styles are specified on your product page.
Product Organization
Products must be organized by product type with appropriate tags. The product type categorizes what your product is, while tags help with search and filtering within your store.
Publish the product page once everything is in order. Repeat this process for each product or service you wish to offer to build out your Shopify store’s inventory.
3. Install a Shopify Theme
The third step is to install a Shopify theme. A Shopify theme is a pre-designed framework that dictates the visual layout, aesthetic style, and overall appearance of your online store. Shopify offers a wide range of themes (including both free and paid options) to accommodate different business sizes, types, and aesthetic preferences.
To install a Shopify theme, browse the Shopify Theme Store. Use filters to narrow down themes based on features, industry, design style, and price. Take advantage of the theme previews to see how each theme looks and feels before making a decision.
After you’ve selected a theme for your Shopify store, click on ‘Add theme’ if it’s free. Click ‘Buy’ for paid themes and complete the purchase. The theme then appears in your Shopify admin under the ‘Themes’ section. Click on it and select the ‘Publish’ button to set the theme.
4. Customize Your Shopify Store
The fourth step is to customize your Shopify store. This customization process allows you to tailor the look and feel of your store so it aligns with your brand identity and encourages brand recall.
To customize your Shopify store, navigate to the ‘Themes’ section of your Shopify admin. Locate your currently active theme and click “Customize”. This launches the theme editor, which provides a live preview of your changes as you make them.
The left sidebar within the theme editor is your main navigation for customization. The “Sections” area here allows you to customize various parts of your store.
There are 3 components to pay attention to when customizing your Shopify store. The first is the homepage layout. The second component is the header styling and its elements. Header styling includes your logo, navigation menus, search bar, and any other elements that appear at the top of every page. The third component to customize is the footer styling and its elements. The footer appears at the bottom of every page. We explain these in more detail below under step 6.
You’ll also find the “Theme settings” option in the left sidebar. This section enables broader aesthetic adjustments that apply across your entire store.
We recommend customizing these 5 elements within Shopify Theme Settings. They are your business logo, color schemes, typography (font), layout and button styles.
5. Add Standard Web Pages
The fifth step is to add standard web pages. Standard web pages are the essential pages of any legitimate Shopify store.
Navigate to the top menu bar of the Customize Theme interface and switch from “Home page” to “Pages”. Click “Create template” to create new pages. There are 6 standard web pages to add:
About Page
The About Page tells the story of your business, your team, and the values driving your brand.
Contact Page
The Contact Page offers a way for customers to reach out.
FAQ Page
An FAQ Page answers Frequently Asked Questions (FAQ) about your products, services, and policies.
Privacy Policy Page
A Privacy Policy Page outlines how customer data is collected, used, and protected. Shopify’s Privacy Policy Generator creates a tailored privacy policy for use here.
Shipping Policy Page
A Shipping Policy Page details your shipping methods, costs, delivery times, and geographical restrictions.
Return Policy Page
A Return Policy Page outlines the conditions under which items are eligible for returns, the return process, and any associated costs. Make use of Shopify’s Refund Policy Generator.
6. Set up Header and Footer Menus
The sixth step is to set up header and footer menus. These menus help users find information quickly, and improves the overall usability of your store.
Log into your Shopify admin dashboard, and click “Online Store” in the left sidebar to expand this section. Select “Navigation” from the options. This takes you to the page where you manage your store’s menus.
To configure Your Header Menu, look for the menu that’s designated for the header (commonly named “Main menu”). Click on the name of the menu to edit it. Add, remove, or rearrange menu items to ensure your header menu includes links to the most important pages or collections. To add a new item, click “Add menu item,” and enter the name for the menu item (e.g., “Shop,” “About Us”). Then select the corresponding page or collection from the “Link” dropdown menu.
The footer menu is located at the bottom of your site and often includes links to your privacy policy, return policy, contact information, and social media. Footer menus are ideal for less prominent links that are nonetheless important for customer trust and legal compliance.
To Configure Your Footer Menu, locate the menu designated for the footer (typically named “Footer menu”). Click on the menu to edit it similarly to the header menu. Add menu items that link to your standard web pages like “Privacy Policy,” “FAQ,” and “Contact Us.”
7. Add a Custom Domain
The seventh step is to add a custom domain. A custom domain is a unique, branded domain name specifically chosen for your Shopify store. It replaces the default “yourstore.shopify.com” URL with a more professional and memorable web address, such as “www.yourstore.com.” This enhances your brand’s credibility and makes it easier for customers to remember your online store.
There are 2 ways to add a custom domain name to your Shopify store. The first way is by registering a new domain name with Shopify. This option allows you to choose and purchase a new domain directly through the platform. It integrates domain registration and management directly into your Shopify admin so you’re able to easily manage everything in one place.
The second way is by connecting an existing domain name from a third-party domain registrar. Those who already own a domain through another provider need to connect it to their Shopify store.
8. Set up Shopify Shipping
The eighth step is to set up Shopify Shipping. Shopify Shipping is a built-in feature offered by Shopify that allows merchants to more conveniently manage shipping directly from their Shopify admin. There are 3 things to do when setting up Shopify Shipping:
The first is to set shipping rates to your customer location. This involves setting different rates for domestic and international shipping. Specify rates by regions, countries, and zip codes ensuring they accurately reflect real shipping costs.
The second is to determine the conditions for free shipping. Offering free shipping incentivizes purchases. An example shipping condition to set is to offer free shipping for orders above $200.
The third is to print shipping labels. Shopify Shipping allows you to purchase and print shipping labels directly from your Shopify admin for each order.
9. Set up Shopify Payments
The ninth step is to set up Shopify Payments. Shopify Payments is Shopify’s integrated payment processing solution that allows merchants to accept a variety of payment methods without the need for a third-party gateway.
Shopify Payments enables your store to accept major payment methods such as credit and debit cards (e.g. Visa, MasterCard, American Express) and digital wallets (e.g. Apple Pay, Google Pay, and PayPal). This gives customers the flexibility to use their preferred payment method.
Another advantage of using Shopify Payments is the 0% transaction fee. Credit card processing fees still apply, but Shopify does not charge additional transaction fees on sales when you use Shopify Payments as your payment processor.
10. Set up Shopify Tax
The tenth step is to set up Shopify Tax. Shopify Tax refers to the suite of features and tools provided by Shopify to help merchants automatically calculate and manage sales taxes on their online store. This simplifies the complex process of tax compliance. It ensures that the correct tax rates are applied to products based on the customer’s location and the type of product sold.
Shopify Tax is strongly recommended to merchants selling to or servicing customers in the United States. This is because tax regulations vary significantly from state to state and even city to city.
11. Test and Review Your Shopify Store
The eleventh step is to test and review your Shopify store to ensure a smooth shopping experience. There are two things to test: the user journey, and order processing and fulfilment.
The first thing to test is the user journey. Exploring your store from a customer’s perspective. Focus on navigation, browsing and the checkout process. Verify that all links, menus, and buttons function correctly, and that product information is accurately displayed. Repeat this on different devices (e.g. desktops, laptops, tablets, smartphones) and browsers (e.g. Chrome, Firefox, Safari, and Edge) to ensure site responsiveness and compatibility.
The second thing to test is your store’s order processing and fulfillment processes. Do this by placing test orders.
12. Launch Your Shopify Store
The twelfth and final step is to launch your Shopify store.
To make it visible to and accessible by your customers, look for the left sidebar menu in your Shopify admin. Click on “Online Store,” which expands to show more options. Select “Preferences” from the expanded list.
Scroll down to find the “Password protection” section within the Preferences page. You’ll see an option to “Restrict access to visitors with the password.” This is enabled by default for new stores to prevent public access until you’re ready to launch. Uncheck this option to remove the password protection and open your store to the public.
After unchecking the password protection option, make sure to click the “Save” button at the top or bottom of the page to apply the changes. Your Shopify store is now launched.
What Is a Shopify Store?
A Shopify store is a type of customizable online storefront created using the Shopify eCommerce platform. Aspiring sellers use Shopify’s solutions to create an online store within a single, integrated platform layout that lets them list products, manage inventory, process orders, and accept payments. This allows them to get into eCommerce without needing high-level technical knowledge. Example types of Shopify stores include Shopify beauty stores like Meow Meow Tweet, Shopify apparel stores like Tentree and Shopify gadget stores like Kulala. If you want to explore other ways than Shopify to create an online store, read our detailed guides on how to create an online store.
What Is Shopify?
Shopify is an eCommerce platform that provides businesses of all sizes with a comprehensive set of tools to create and manage online stores. It was originally created by Tobias Lütke, Daniel Weinand, and Scott Lake in 2006 as a solution to their own online selling challenges. Shopify’s ecosystem includes Shopify POS for integrating in-person sales, Shopify Payments for online payment processing, and a vast Shopify App Store. Shopify is also a cloud-based solution, which allows merchants to access and manage their store from anywhere.
What Do I Need to Create a Shopify Store?
You need a Shopify subscription and a domain name at minimum to create a Shopify store.
Signing up for a Shopify subscription gives access to the platform’s comprehensive range of tools and services for building and managing your online store. You get your domain either by using Shopify’s free default domain (yourstore.shopify.com) or by registering a custom domain(such as www.yourstore.com) from a separate domain registrar. Purchasing your own custom domain enhances your brand’s professionalism and makes it easier for customers to remember and find you but requires additional spending.
Can I Host Shopify With a Third-Party Web Host?
No, you cannot host Shopify with a third-party web host in the traditional sense, as Shopify is a hosted platform. This means that all of your Shopify store’s data, including product information, customer data, and order details, are hosted on Shopify’s servers.
Shopify does offer their Headless Commerce approach for those seeking greater flexibility in design and functionality. Headless Commerce allows you to host your storefront (the front-end) separately from your Shopify data (the back-end). This means you’re able to build your online store’s front-end on a third-party web host, like Hostinger, and integrate it with Shopify for its eCommerce functionality. This setup requires a subscription to both Shopify and the third-party hosting service.
What Hosting Type Is Recommended for Hosting a Shopify Storefront?
eCommerce hosting is the recommended hosting type for hosting a Shopify storefront via their Headless Commerce approach. This type of web hosting provides the necessary infrastructure and features to ensure high-speed performance, security, and scalability required for handling online transactions, customer data, and high traffic volumes effectively.
The very best eCommerce hosting takes the forms of Virtual Private Servers (VPS) or cloud hosting. VPS hosting offers a dedicated portion of a server’s resources, including memory and processing power. Cloud hosting involves hosting your shop on a network of virtual servers in the cloud. Resources are dynamically adjusted based on your Shopify storefront’s traffic and performance needs. Check out our list of recommended best eCommerce hosting.
What Shopify Apps Are Useful for Building Shopify Stores?
Useful Shopify apps for building Shopify stores include dropshipping, product review, and email marketing apps. Shopify Apps are plugins or extensions that enhance your store’s features or add new functionality. These apps are available in the Shopify App Store and are either free or paid.
Dropshipping apps like CJdropshipping, Spocket, and DSers enable you to sell without inventory by connecting you with global suppliers. Shopify’s product review apps like Judge.me, Loox, and Vitals allow customers to leave feedback, which help boost your store’s credibility. Email marketing apps like Klaviyo, Mailchimp, and Shopify Email offer tools for targeted email campaigns and customer engagement.
How Much Does It Cost to Start a Shopify Store?
The cost to start a Shopify store ranges from $20 to $5,000. There are 4 factors that greatly affect the final cost:
Domain Name
A domain name ranges from $0.70 to $14 annually. Prices vary based on the TLD (.com, .net, .biz, etc.) and domain registrar. Shopify gives you a default domain for free if you don’t wish to spend on domains.
Shopify Subscription
Shopify subscriptions start at $19 per month for the Basic Shopify plan. The standard Shopify plan is $49 per month, and the Advanced Shopify plan is available for $299 per month. Shopify Plus offers custom pricing for enterprise-level needs.
Paid Components
Shopify apps come at a range of prices depending on the feature you’re looking at. Most paid apps cost between $5 to $50 per month and many have free trials.
Inventory
Initial inventory costs range from $1,000 to $2,000 unless employing a dropshipping approach (which has no upfront costs).