
Maintaining the website that you created is a continuous process of updating plugins and themes, redesigning layouts, ironing out problematic code segments, and many other tasks. Luckily, WordPress comes with its own maintenance mode, which you can simply turn on to show any visitors a message that your site is down for maintenance.
However, how would you turn this mode on? What are the common issues that you may encounter when you use this mode (and how do you fix them)? How do you turn it off?
Worry not! In this article, we’ll be answering all of these questions as well as going into detail as to what maintenance mode is. If you’re looking to learn more about this wonderful WordPress feature, then read on!
What Is WordPress Maintenance Mode?

As we’ve stated, WordPress’s maintenance mode is a way to prevent visitors from accessing your site while you’re updating it. If they visit your site while it’s in maintenance mode, they’ll just be shown an error message that says the site is down.
You can configure this message to say anything that you want, such as an estimated time of completion or a short summary of why the site is down.
Website owners usually use maintenance mode for the following purposes:
- For… general maintenance! Maintenance mode is usually used for, well, general maintenance. For example, if you need to update some plugins or make simple revisions to the layout of a page or two, you can put your site in maintenance mode to avoid showing visitors anything unsightly, such as a placeholder layout.
- To avoid making a bad impression for visitors For example, if you’re a website-building newbie, you may have just excitedly set up your first site in a hurry, and it will likely be a mess: It may be full of broken links, missing images, and problematic code. As such, you’d be better off leaving it in maintenance mode while you iron out these issues, avoiding making any bad impressions on any visitors before your site is (actually) ready.
- Site security Finally, you can use maintenance mode to secure your WordPress site. If your site has recently been hacked, you may want to comb through your site as well as its links and code to ensure that you’ve fixed all of its security issues. You don’t want your site’s visitors to click on a compromised link that downloads a trojan, after all. With maintenance mode, you’ll be able to put your site on lockdown while you plug up any holes in its security. See more WordPress website security tips here.
3 Ways to Enable Maintenance Mode in WordPress
Now that you know what maintenance mode is and what it’s used for, you may be wondering how to use this cool little feature for your site. We’ll be going over three different methods for activating maintenance mode:
- Via Hostinger’s hPanel Dashboard
- Via the .htaccess File
- Via a plugin
Let’s get started!
1. Via hPanel (hostinger only)
If you’ve signed up with Hostinger (we can’t blame you, it’s one of the best WordPress hosts around, after all), you’re in luck—enabling maintenance mode on your site is as simple as logging in to your hPanel dashboard and flipping a switch:
First, log in to hPanel. Then, navigate to “WordPress Dashboard,” and click on “Core.” In the options that pop up, click on the slider button to the right of “Maintenance mode.”
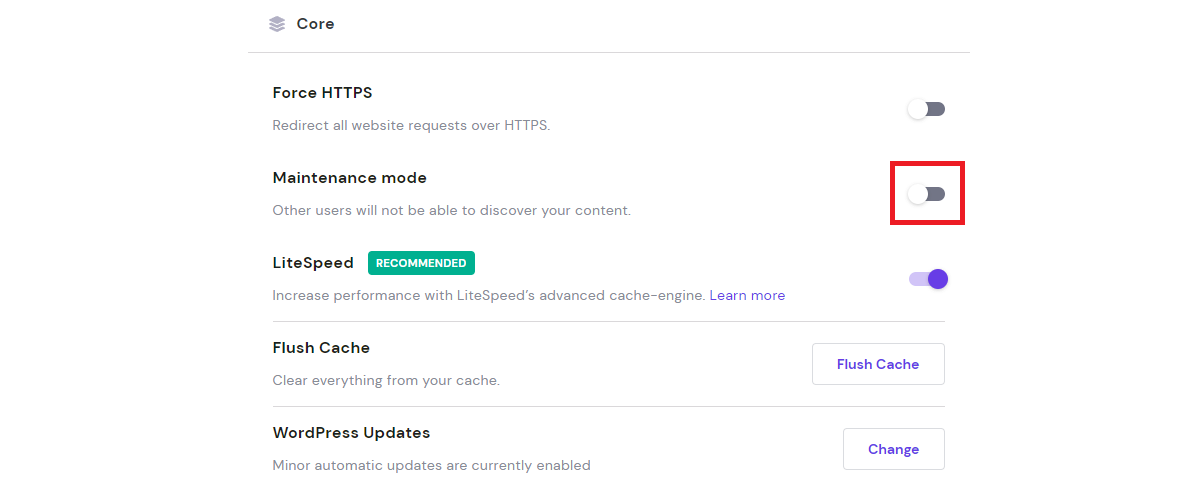
Once you’ve done this, you’re set! Your site is now in maintenance mode.
This method has one drawback, however: You can’t customize the message that appears for any of your site’s visitors. Instead, they’ll only be greeted by the following unchangeable message:
“Briefly unavailable for scheduled maintenance. Check back in a minute.”
2. Via the .htaccess file
We’ll also be using Hostinger for this method.
First, log in to hPanel and click on “File Manager.” In the panel that appears, open the “public_html” directory.
In this directory, create a “maintenance.html” file that contains the message that you want to show when your site is in maintenance mode. You can code this file in HTML as you want, making adjustments to the message as needed.
Next, locate the .htaccess file in the “public_html” directory.
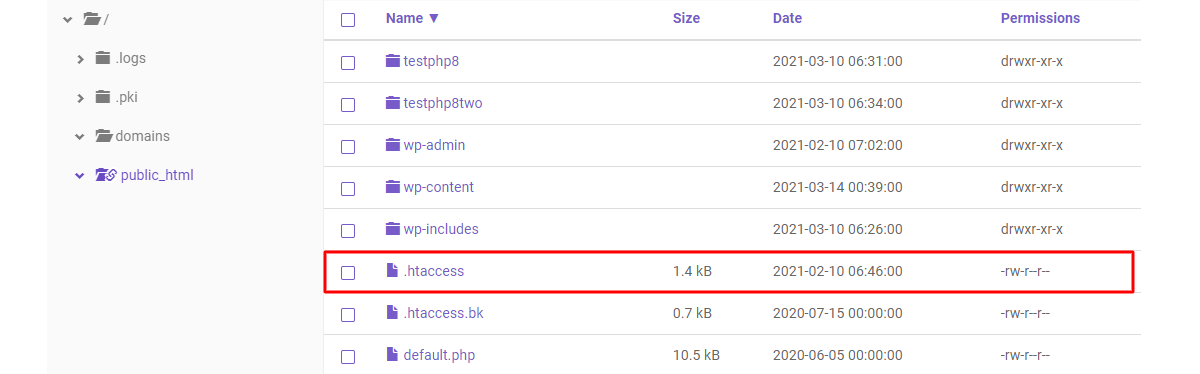
Take note! Before making any changes to this file, we highly recommend that you make a backup, as this is one of your site’s core files. If you mess up the code in some way, you can use this backup to restore your site to the way that it was.
Right-click on .htaccess, and select “Edit.” To make a backup, simply copy all of the contents of the .htaccess file, and paste it into a new file, which you can name “.htaccess_backup” or something.
Now, add the following snippet of code to the end of the original .htaccess file:
RewriteEngine On
RewriteBase /
RewriteCond %{REQUEST_URI} !^/maintenance\.html$
RewriteRule ^(.*)$ https://example.com/maintenance.html [R=307,L]
Any visitors to your site will be redirected to the “maintenance.html” page, which shows the message that you created in HTML.
3. Via a plugin
If you’ve signed up with a WordPress host that isn’t Hostinger (or you don’t want to mess around with a file that may potentially kill your site), you can simply use a plugin to set up a maintenance page for your site. In this example, we’ll be using the LightStart plugin to set up maintenance mode.
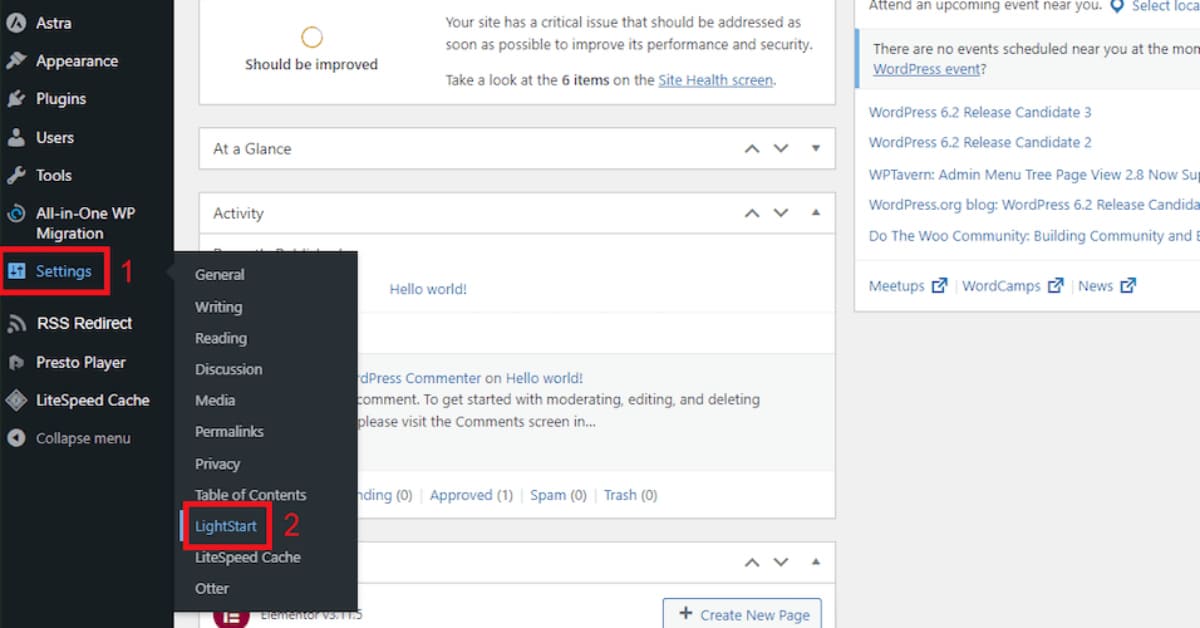
Once you’ve installed and activated LightStart, simply navigate to “Settings” and then click on “LightStart.”
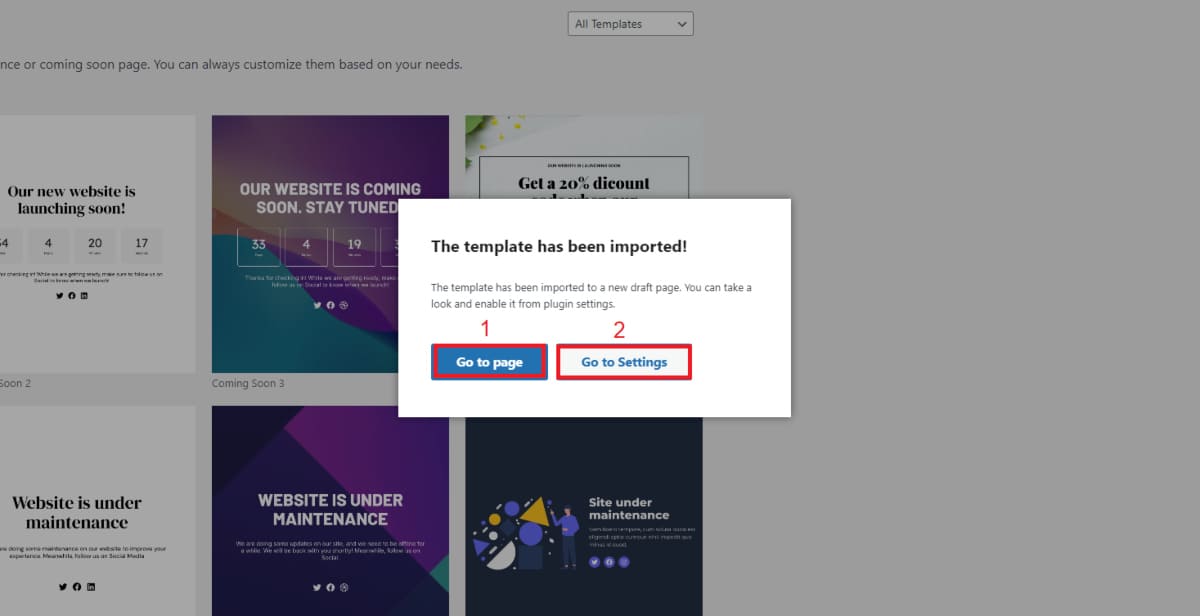
You can then click on the “Design” tab to set up your maintenance page. Simply pick from one of LightStart’s numerous templates by hovering your cursor over a template and then clicking on “Import template.”
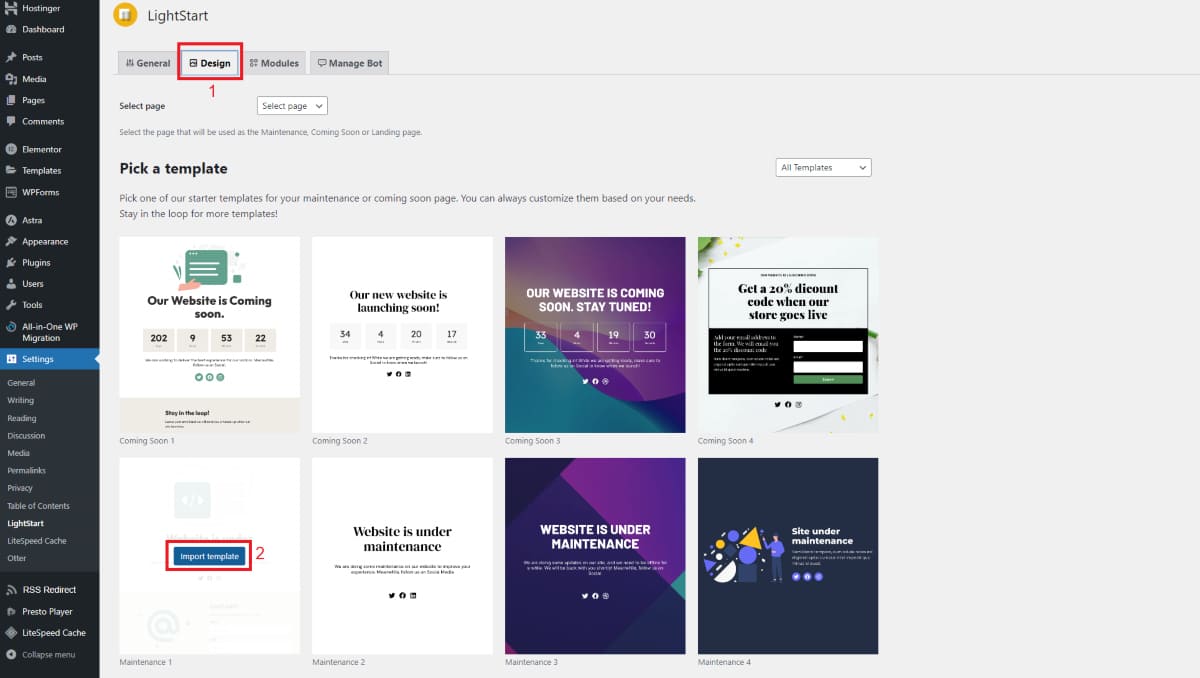
In the small popup that appears, you can pick “Go to Settings” if you just want to set up your maintenance page as soon as possible. If you want to edit the maintenance page using the page editor, you can click on the “Go to page” option.
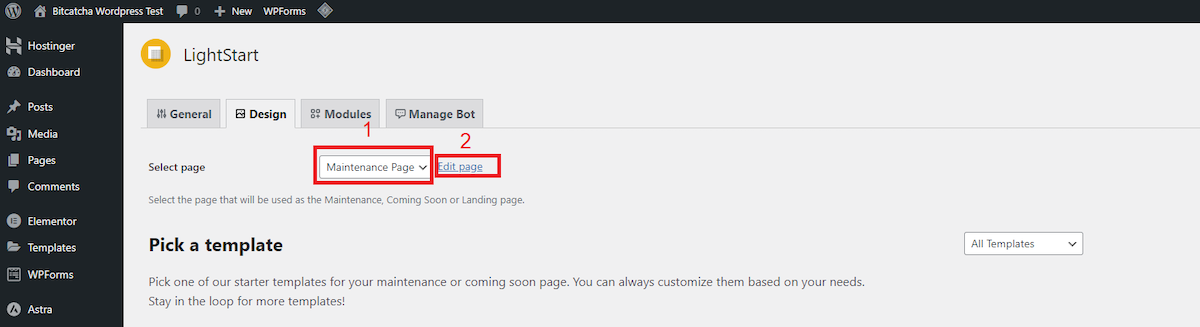
The template that you have chosen will automatically be selected as your site’s maintenance page. However, you can simply change the maintenance page to be another page via the “Design” tab.
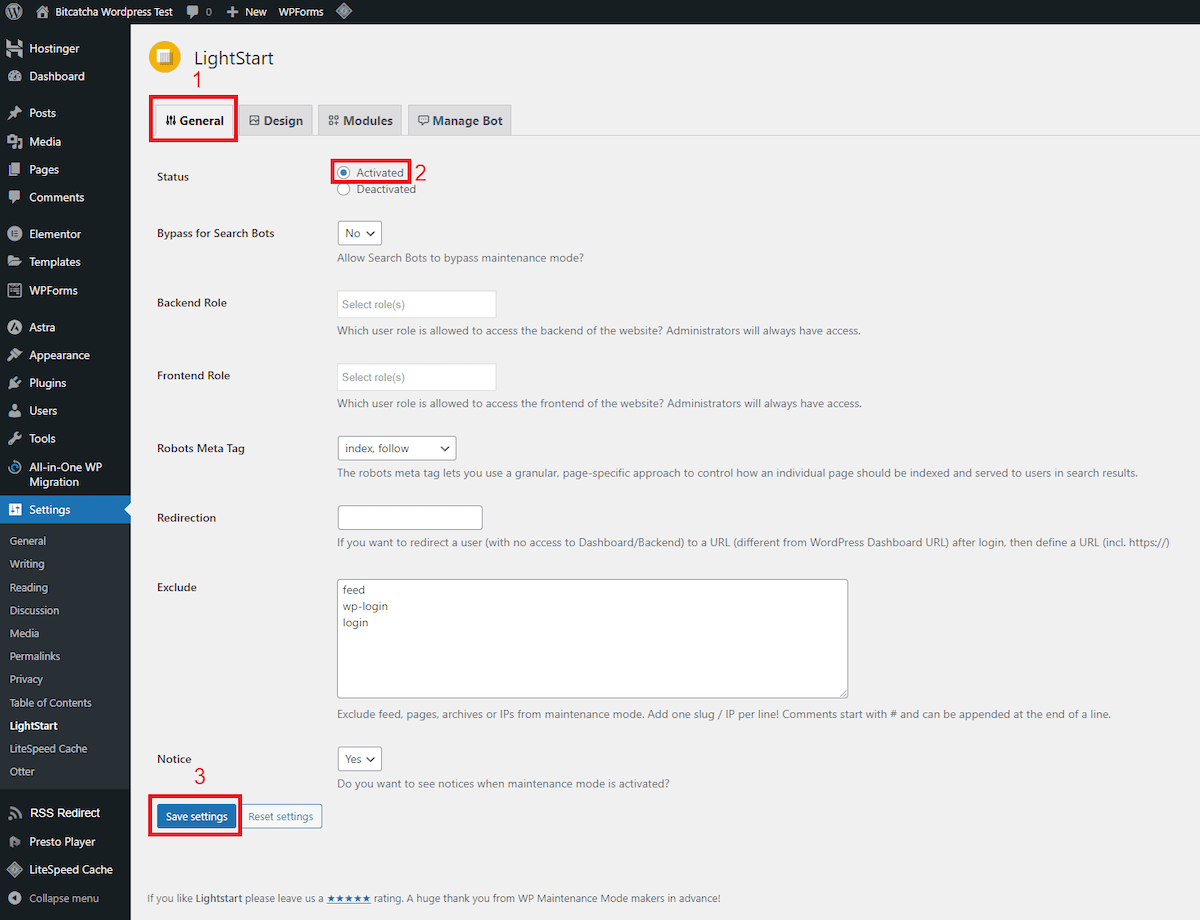
Once you’ve tweaked your pages to your heart’s content, navigate to the “General” tab, click on “Activated” to the right of “Status,” save your changes, and you’re done. Your site is now in maintenance mode!
How Do I Disable Maintenance Mode After Completing Maintenance?
After you’ve completed your site maintenance and want to turn off your WordPress site’s maintenance mode, you can simply do the following for the methods that we’ve provided:
1. Via hPanel
To disable maintenance mode, log in to hPanel, go to “WordPress Dashboard,” click on “Core” again, and then click on the slider button to the right of “Maintenance mode.”
2. Via the .htaccess file
If you’ve edited your site’s .htaccess file to activate maintenance mode, you’re going to have to do the following steps to disable it:
Log in to hPanel and click on “File Manager.” In the panel that appears, open the “public_html” directory. Then, locate the .htaccess file.
Right-click on .htaccess, and select “Edit.” Then, delete all of the code that you’ve added previously. Alternatively, you can just copy over all of the text from the backup file that you created and paste it onto this file. Save your changes, and that’s it—you’ve disabled maintenance mode.
3. Via the LightStart plugin
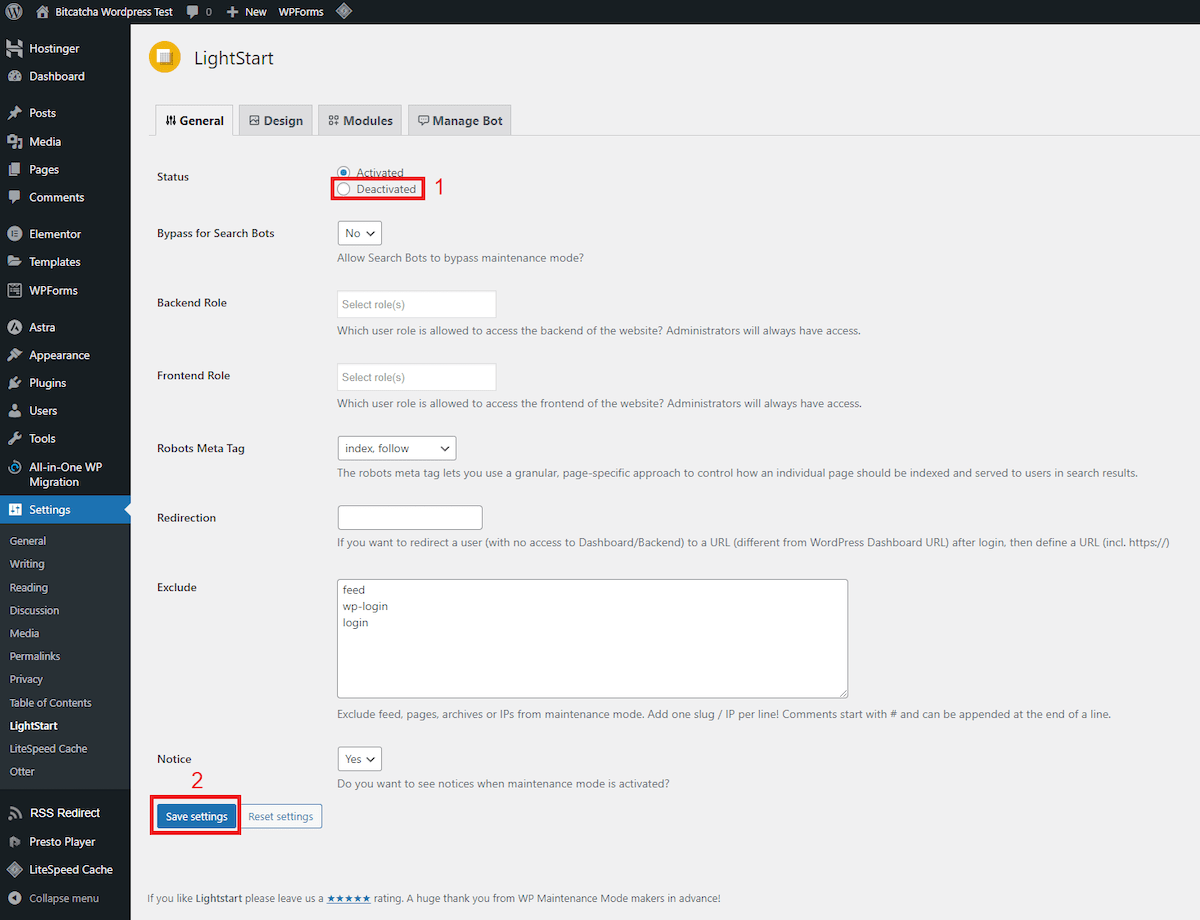
If you used LightStart to activate maintenance mode, you can simply navigate to “Settings” and then click on “LightStart.”
In the panel that opens, navigate to the “General” tab, click on “Deactivated” to the right of “Status,” and save your changes.
How to Troubleshoot Common Maintenance Mode Issues
When you go into maintenance mode, you may encounter various issues. In this section, we’ll be taking a look at (and solving) two of them:
1. Cache issues
Many times users might see a cached version of your site (a static copy of your file that is temporarily stored). This version might not show any of the recent changes that you’ve made to your site, such as activating maintenance mode.
To solve this, you can simply install a plugin, such as WP Rocket, which helps you optimize your website and clears your site cache. To do this, you can simply navigate to “Settings” and then click on “WP Rocket.”
In the WP Rocket panel, simply navigate to the “Quick Actions” section, and click on the “Clear Cache” button.
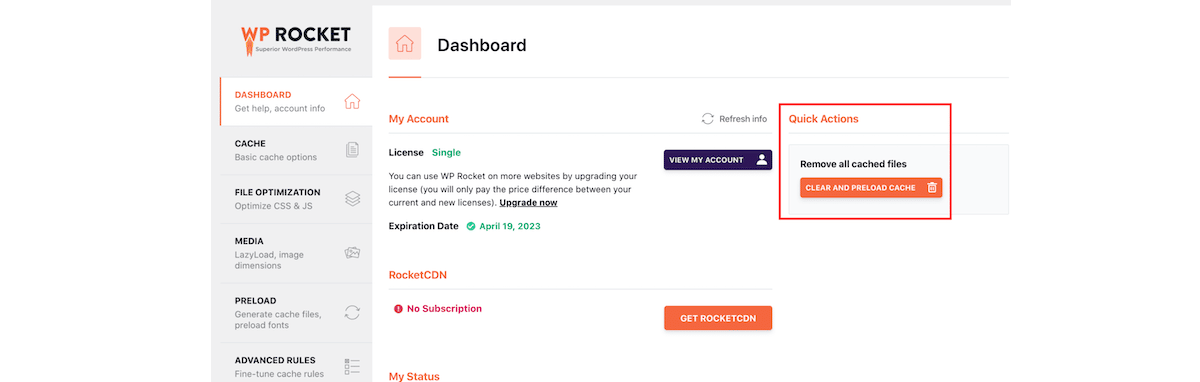
(Source: WP Rocket)
2. Stuck in maintenance mode
Another common issue is that your site may get stuck in maintenance mode, which can also prevent you from logging into your site and disabling maintenance mode.
To solve this issue, you can simply log into your site via FTP. Once you’ve done this, you can proceed to the root of your site or public_html folder (this folder usually contains the wp-config.php file). Once you’re at the root directory, you can go ahead and delete the maintenance file.
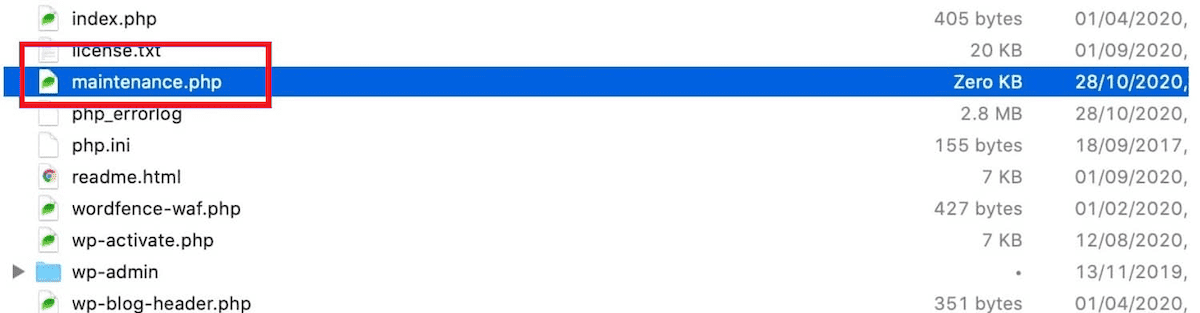
Once you’ve deleted this file, open your site again in your browser (or refresh it if it’s already open), and it should be back to normal. Oh, and you’ll also want to clear your cache (as we’ve discussed in the previous section), just to be safe.
If all else fails, you can also go back and retrace your steps. For example, you may have just missed out on clicking “Save settings” in your WordPress dashboard after configuring your maintenance mode plugin—this happens a lot more than you think!
A Well-Maintained Website Is A Happy Website
WordPress’s maintenance mode is a great tool to use when you’re working on your WordPress website and need to shut it down temporarily.
After all, taking your site down for a day is probably a better alternative to leaving it in an awful state. And now that you understand how to use maintenance mode, any maintenance periods for your site will be a breeze!