


Building a WordPress website is a popular choice for anyone looking to establish an online presence on a user-friendly platform. This article outlines the 9-step process of how to create and launch your very own WordPress site. We explain choosing between WordPress.com or WordPress.org and how to select the best web host. We also cover WordPress theme customization, WordPress plug-in selection and final checks before launch.
1. Choose a Hosting Service
The first step of building a WordPress website is to choose a hosting service. A hosting service is responsible for storing all your WordPress website’s data and making it accessible to visitors. There are two main options for WordPress hosting: self-hosted WordPress and WordPress.com.
Self-hosted WordPress involves using the WordPress software from WordPress.org on your own web hosting account. This option gives you more control and customization possibilities. Note that you’ll need to select a web host that supports PHP version 7.4 or greater. You also need your web host to support MySQL version 5.7 or greater or MariaDB version 10.4 or greater for optimal performance and compatibility with WordPress.
WordPress.com is an alternative hosting service offered by Automattic, the company behind WordPress. WordPress.com is an all-in-one service that provides hosting, security, and backups. The downside is that it has serious limitations in terms of monetization, plugin installation, and theme customization, especially in its free or lower-tier plans.
Those looking for more flexibility and control over their website’s design and functionality opt for self-hosted WordPress.
2. Register a Domain Name
The second step is to register a domain name. A domain name is your website’s address on the internet and ideally matches your WordPress site’s name. Your domain name is how your visitors find you online. You have two options for registering your WordPress site’s domain.
The first option is through your WordPress web host (for self-hosted WordPress sites). Many providers offer domain name registration as part of their hosting packages. This is a convenient option as it bundles your hosting and domain registration and simplifies management and billing.
The second option is via a domain registrar. A domain registrar is a company specialized in registering domain names. It’s possible to register your domain name with a registrar of your choice if you prefer to keep your domain registration separate from your hosting service. You then need to link your domain name to your hosting service.
Note that WordPress.com users automatically get a free subdomain (e.g., yoursite.wordpress.com) after registering. You need to upgrade to a custom domain directly within WordPress.com for a more professional look.
3. Install WordPress
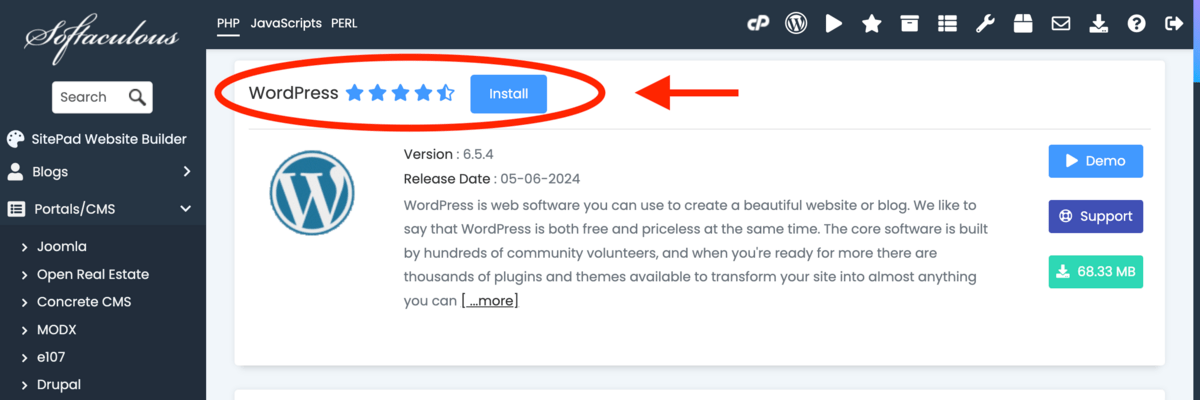
The third step is to install WordPress. Installing WordPress is a straightforward process that’s done in 2 ways depending on your hosting service. The first way to install the WordPress CMS (Content Management System) is via the client portal or custom control panel in your hosting service. Many hosting services offer a guided WordPress installation process through their client portal or custom control panel. The second way to install WordPress is via cPanel with Softaculous App Installer. Hosting services that provide the cPanel control panel allow you to iinstall WordPress using the Softaculous App Installer. Simply navigate to ‘Softaculous Apps Installer’ in the ‘Software’ section, select WordPress. Fill in the necessary details like admin credentials and site name. Then click ‘Install’ for an automatic setup.
For those who have chosen managed WordPress hosting, WordPress will already be pre-installed for your website. Managed WordPress hosting services handle the installation, updates, and management of WordPress for you.
After installing WordPress, remember to ensure your site remains private throughout the development phase. Go to Settings > General in your WordPress dashboard and make sure the option “Discourage search engines from indexing this site” is checked. This prevents search engines from indexing your site prematurely. It guarantees that your site will only be visible when everything is polished and ready for your audience.
4. Install a WordPress Theme
The fourth step is to install a WordPress theme. A WordPress theme is a collection of files (code, graphics, style sheets) that work together to create the design and functionality of a WordPress site. Each theme offers different styles and design elements to let you customize the appearance and layout of your site.
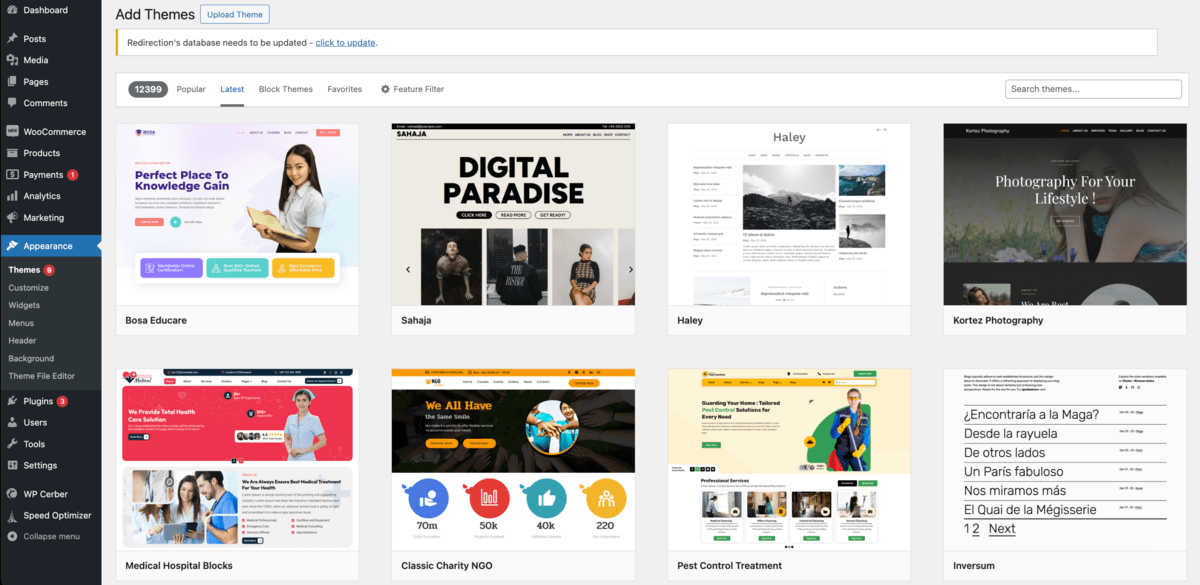
To install a WordPress theme, navigate to ‘Appearance’ and then ‘Themes’ in your WordPress dashboard. Select ‘Add New Theme’. Then, filter and browse through themes to find one that suits your site’s needs. Once you’ve made your choice, click to install and then activate the theme.
To further customize your WordPress site, install a drag-and-drop builder plugin. These plugins provide a user-friendly interface for customizing themes and creating layouts. To install one, go to ‘Plugins’ and then ‘Add New Plugin’ in your WordPress dashboard. Search for popular builder plugins, such as Elementor, Beaver Builder, Otter Blocks, or SeedProd.
5. Publish Pages
The fifth step is to publish pages. In WordPress, “Pages” refer to one of the two primary content types created within the platform. Pages are designed for static content that is not time-sensitive, unlike posts which are commonly used for blog entries and articles. Pages are mostly used to create the fundamental structure of a website.
To publish a new page, navigate to ‘Pages’ in your WordPress dashboard and select ‘Add New Page’. There are 4 standard website pages to publish on your WordPress site:
Homepage
The Homepage is the first page visitors see. WordPress offers many free and paid themes for easy static homepage design.
About Page
The About Page provides background information about you or your company. WordPress’s flexible content management system makes it easy to craft an About Page that includes text, photos, and even videos to connect with your audience.
Contact Page
The Contact Page is essential for visitors to reach out to you. WordPress offers plugins like WPForms or Contact Form 7 to integrate contact forms and even add an interactive map.
Privacy Policy Page
The Privacy Policy page informs visitors about the policies regarding the collection, use, and protection of user data on your website. Plugins like WP AutoTerms help generate a comprehensive Privacy Policy.
Each of these pages plays a vital role in informing visitors and providing a comprehensive understanding of what your website and business are about.
6. Publish Posts
The sixth step is to publish posts. “Posts” in WordPress are another fundamental content type, distinct from “Pages.” Posts are entries listed in reverse chronological order on your site’s blog or homepage. They are commonly associated with time-sensitive content like news, blogs, or updates, and allow interaction through comments.
To publish a post, go to ‘Posts’ in your WordPress dashboard and select ‘Add New Post’. This section is where you create and manage your blog content or other regular updates.
A standard post in WordPress includes four key elements. Firstly, the title contains the headline of the post. Secondly, headings are used within the post to structure content. Thirdly, the text makes up the body of the post where you provide information, share ideas, or tell stories. Lastly, images provide visual elements that complement and enhance the text.
Note that the choice to include posts depends on your website’s goals and the needs of your target audience. Skip publishing posts if your website’s focus does not require regular updates or blog-style content. Such websites effectively function with just static pages.
7. Set Up Header and Footer Menus
The seventh step is to set up header and footer menus. The “header menu” and “footer menu” are key navigation elements that guide visitors through your WordPress website. The header menu is located at the top of your website and is visible on all pages. It includes links to the most important sections of your site, such as the homepage, about page, contact page, and prominent pages. The footer menu is located at the bottom of your website. It contains links to less prominent but still important information like privacy policies, terms of service, or secondary pages.

To set up these menus in WordPress, navigate to ‘Appearance’ and then ‘Menus’. Here, you’ll have the option to ‘create a new menu’.
For the header menu, create a new menu and name it appropriately (e.g., “Header Menu”). In the ‘Menu Settings’, check the option for “Header” under ‘Display Location’. This action assigns your new menu to the header area of your website. Then, add the pages or posts you want to include in this menu.
For the footer menu, create another new menu and name it accordingly (e.g., “Footer Menu”). In the ‘Menu Settings’, select “Footer” for the ‘Display Location’. This will place your new menu in the footer area of your website. Add the pages or posts that are relevant for your footer.
8. Test and Review Your WordPress Website
The eighth step is to test and review your WordPress website. Before launching your WordPress website, it’s crucial to ensure everything functions correctly and provides a positive user experience. There are three things to do:
The first is to install an SSL Certificate. SSL (Secure Sockets Layer) certificates encrypt data transferred between your WordPress website and its visitors. Most WordPress web hosting providers offer easy SSL certificate installation that is included for free in their plans.
The second is to check all WordPress pages and posts for UI (User Interface) errors, broken links, and broken images.
The third thing to do is to test your WordPress site on different browsers and devices. It’s important to check your website provides a consistent experience across various browsers (e.g. Chrome, Firefox, Safari) and devices (e.g. smartphones, tablets, laptops).
9. Launch Your WordPress Website
The final step is to launch your WordPress website. This makes your site live and accessible to the public.First, navigate to ‘Settings’ and then ‘General’ in your WordPress dashboard. This is where you initially set your website’s basic configurations.
Next, locate the option “Discourage search engines from indexing this site”. Uncheck this option. This action signals search engines like Google, Bing, and others to start indexing your site, and makes it discoverable in search results. It’s an essential step for attracting organic traffic to your site and for SEO (Search Engine Optimization).
What Is a WordPress Website?
A WordPress website is a site that has been built using the WordPress platform (WordPress.com or WordPress.org). Choosing to start a WordPress website allows users to utilize the wide range of powerful themes and plugins in WordPress’s ecosystem as they create their website. WordPress’ powerful features also streamlines the process of adding content, customizing their website’s design, and in overall website management.
What Is WordPress?
WordPress is a free, open-source platform used worldwide for building websites. It started in 2003 as a blogging platform. Now, it has grown into a full content management system (CMS) for all kinds of websites including eCommerce sites, portfolios, and forums. It powers more than 43% of the web. WordPress is easy to use and offers powerful features for SEO and site customization. It has a large community that regularly contributes themes and plugins, which further enhances its functionality.
What Types of Websites Can I Create Using WordPress?
You can create 4 types of websites using WordPress:
WordPress Blog
A WordPress blog allows you to publish articles, photos, and videos. It’s ideal for individuals or businesses looking to share thoughts, ideas, or updates.
Should I Start a Blog Using WordPress?
Yes, you should start a blog using WordPress, especially if you’re new to blogging. The WordPress CMS offers a user-friendly interface ideal for beginners, coupled with robust functionalities to suit any blogging need. It includes many free blog-friendly themes. WordPress also enhances your blogging experience with its extensive range of free plugins. These add additional functionalities to your blog, such as SEO tools, social media integration, and contact forms.
WordPress Online Store (WooCommerce)
A WooCommerce Store is a WordPress site coupled with the WooCommerce eCommerce plugin. You sell physical or digital goods, manage inventory, process payments, and handle shipping. Creating a WooCommerce store just involves a few extra steps after installing WordPress.
WordPress Portfolio Site
WordPress portfolio sites are used by artists, designers, photographers, and other professionals to showcase their work. These sites include galleries, slideshows, and portfolios.
WordPress Membership Site
WordPress Membership Sites make content available exclusively to registered members. These sites include forums, exclusive content and courses. They are often monetized through subscription models.
What Type of Hosting Is Recommended for WordPress Sites?
Two types of hosting are recommended for WordPress sites: WordPress hosting and managed WordPress hosting. WordPress hosting refers to self-hosted WordPress, which means users independently set up their WordPress site’s hosting using a third-party web host’s infrastructure. Many WordPress hosting plans include features like one-click WordPress installs and specialized support to make the process easier.
Managed WordPress hosting provides a more comprehensive service with automated backups, advanced security, and speed optimization. This type of hosting manages the technical aspects of running a WordPress site, and is recommended to those who prefer a hands-off approach in their web hosting. Check our recommended WordPress web hosts to know where to start.
What Is the Cost to Build a Website with WordPress?
The cost to build a website with WordPress ranges from $100 to $25,000 and above depending on your specific requirements. The WordPress CMS (from wordpress.org) itself is free but there are 5 other factors that contribute to the overall cost:
Choice Of Domain Name
Domain names cost between $0.70 to $14 on average annually. Those using free WordPress.com get a free domain for the first year.
Choice Of Hosting Service
Annual hosting service prices range from $20 for shared WordPress hosting to over $6,750 for managed WordPress hosting.
Choice of SSL Certificate
SSL certificates cost between $0 to $3,480. SSL certificates are essential for WordPress sites to secure data and build trust.
Use Of Paid WordPress Themes
Opting for a paid WordPress premium theme costs up to $1,100. These unlock many customization options and features but many simple WordPress themes are free.
Use Of Paid WordPress Plugins
A paid WordPress plugin costs between $49 to $1000 and provides advanced functionality. Charges are either one-time or recurring depending on the plugin. There are also many free WordPress plugins.
Hiring WordPress Developers
Hiring professional WordPress web developers for custom design and functionality costs between $100 to $4,500. Costs depend on the complexity of your WordPress website.
Should I Use a Paid Theme for My WordPress Website?
Yes, you should use a premium theme for your WordPress website because it offers advanced features and greater customization options compared to free themes. A premium theme is a paid theme that’s purchased for a one-time fee or through a subscription. Popular premium WordPress themes include GeneratePress, Astra, and Kadence, which are all known for their performance, flexibility, and excellent support. Make sure that the Premium theme is highly customizable, contains minimal bloat, and provides lifetime support to make the most out of your investment.
Can I Make a WordPress Website for Free?
Yes, you can make a WordPress website for free using WordPress.com. This option allows you to build and host a website at no cost, but comes with 4 critical limitations. Firstly, you are restricted to a selection of free themes. Secondly, you’re unable to upload custom themes or plugins. Thirdly, your site includes WordPress.com advertisements. Finally, your website’s domain name will also include the WordPress.com subdomain (e.g., yoursite.wordpress.com), which has a negative impact on your site’s professionalism. Making a WordPress site for free is only a good starting point for beginners, hobby projects, or testing purposes. Website owners looking beyond this need to consider investing in third-party web hosting.
Can I Build a WordPress Website by Myself?
Yes, you can build a WordPress website by yourself. You can start with pre-built themes to set your site’s design and customize them to fit your preferences. The WordPress CMS is also beginner-friendly with an easy interface for content management and site upkeep. This accessibility allows even novices to effectively create and run a professional WordPress site.