


One often overlooked part of website building is creating an effective website footer. It’s the final thing people see when they scroll down, and it also plays an important part in helping people navigate your website.
That’s why understanding how to customize your footer in WordPress is so important. Whether your goal is to simply get rid of the phrase “Proudly Powered by WordPress” or to entirely revamp it, we’ll show you how you can quickly and easily edit your WordPress footer.
Table Of Contents
What Is A Footer?
Basically, the footer is the area of the website that appears at the bottom of the page. You can usually find it on every page of your website.
A lot of web owners usually don’t pay much attention to this section, but it’s a lot more useful than you’d think. It provides connections to pages that can be helpful to visitors, as well as extra information about you and your website.
Aside from that, the internal links found here also contribute to your site’s SEO.
So, what exactly does a footer consist of? Well, some common elements include:
- Newsletter subscription
- Resources links, including blogs, lessons, and courses
- Customer service
- WordPress sitemap
- Programs and events
- Copyright claims
- Social media icons
- Privacy Policy and Terms and Conditions
- Links to the company’s “About”, “Contact Us” and “Team” pages
Below is an example of a website footer.

It doesn’t take a web development expert to create a footer similar to the one above. You can even use tools such as website builders, which make it easier for you thanks to their drag-and-drop functionality.
Going back to the components mentioned above, it’s important to note that you don’t need to use all of them. And, to prevent having a footer that occupies the majority of the webpage, you should only choose the ones that are essential to your website.
The choice of the footer design is entirely up to you and your preferences. Keep in mind, though, that the theme you choose for your WordPress site might have an impact on the layout, formatting, and functions of the footer.
3 Ways To Edit Your Footer On WordPress
So, let’s look at the various easy ways you can customize your footers:
1. Using the theme customizer to manage the WordPress footer
You can change your website’s design, its header and footer, its titles, and many other common settings using the WordPress Customizer, a feature in your WordPress dashboard. This is the safest and easiest method for editing the footer in WordPress.
Here’s what you gotta do:
- First, find a WordPress theme you want to use. In this example, we’ll be choosing the popular WordPress theme, Astra. This theme offers a lot of customizability options, which is great for almost any WordPress website. But nonetheless, every theme has options for changing the footer.
 The Astra theme is a great choice for almost any website.
 - Then, on your WordPress dashboard, find the Appearance menu and click on “Customize”.
 This menu is also the place where you’ll download your theme.
 - Once you’re in the theme customizer, simply click on “Footer builder”. You can then edit the footer from there.
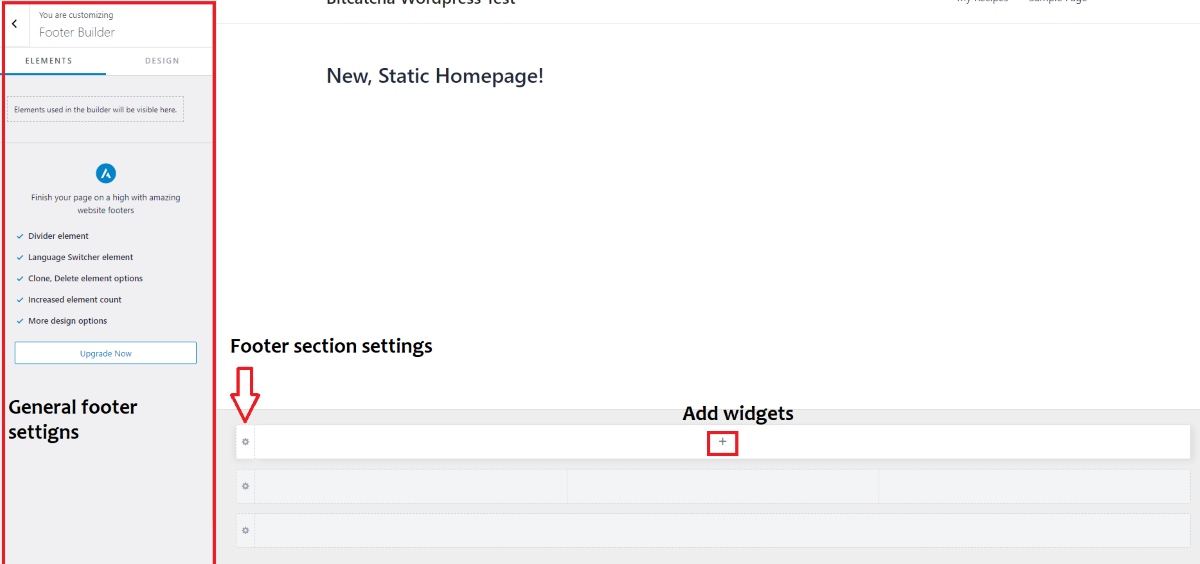
- Editing the footer includes changing its content and appearance, as well as adding additional sections using widgets. By clicking on the “+” sign on each footer, you’ll be able to add widgets to design your website. Then when you click on the gear icon on each footer, it will bring you to the settings of the footer section that you clicked on.
- Once you’re done adding widgets, you can then customize each widget easily through the general footer settings at the left side of the editor.
 It’s easy to edit the footer with the drag-and-drop functionality.
 - When you’re happy with your footer, simply click on “Activate & Publish” above the general footer settings to save your changes.
 Click on “Activate & Publish” to save your changes.


And there you have it! You finally edited the footer of your WordPress website.
If you ever decide to change anything in the future, you can simply return to this section and make the necessary changes.
2. Enhance your WordPress footer with widgets
Some of WordPress’ most useful features are widgets, which are great for adding text, videos, photographs, HTML code, and other content to various parts of your website. You can drag and drop these small content blocks.
Here’s how to do it:
- First things first, access your WordPress dashboard.
- Then, go to the Appearance settings again and click on “Widgets”.
 You need to log in to your WordPress dashboard first before you can access widgets.
 - Here you’ll find numerous footer sections. These are the several blocks in the footer of your website that you can modify using widgets.
 You’ll also find other sections of your website here.
 - You can easily customize the footer by clicking on the “+” icon. A popup will then appear and give you the option to “Browse all”. Simply click on it if you don’t like the presets displayed to you.
 You can simply click on a widget to put it on your footer.
 - When you click on “Browse all”, a popup will appear on the left side of the Widgets page. On this side, you can drag & drop various widgets into the various footer bar sections.
 Just drag and drop the elements you want to use for your footer.
 - Once you’re happy with how your footer looks, you can click on “Update” at the top right of the screen to save your changes.
 Click on “Update” to save your changes.


That’s it! You have another way to edit your footer.
3. Use a footer plugin
If you’re not a fan of the methods we mentioned above, you can always use a plugin.
But out of the hundreds (if not thousands) of footer plugins out there, it can be pretty overwhelming to choose. Fear not! You can take a look at our top picks:
- Elementor Header & Footer Builder
This plugin gives you the option to create custom templates in addition to the header and footer, and set them with a shortcode at any location of your website.
- Insert Headers and Footers
This plugin allows you to add code and scripts without having to change the theme’s files.
- Footer Mega Grid Columns
This plugin arranges footer widgets into columns by displaying them in a horizontal grid.
For this method, we’ll be using the Elementor Header & Footer Builder plugin and here’s a step-by-step guide on how to use it.
- Before everything else, we first need to download the plugin. Simply go to your WordPress dashboard and find the Plugins menu. Then, click on “Add New”.
 Click on “Add New” to install a new plugin.
 - When you’re there, you can search for plugins in the WordPress database. Just search for “Elementor Header & Footer Builder” in the search bar.
- Then, you should be greeted with 2 Elementor plugins. In order for both plugins to work it’s crucial that you download and activate them both, especially the Elementor Website Builder.
 Download both Elementor plugins.
 - After you’ve activated and installed the plugin, go back to your WordPress dashboard and find the Appearances menu. Then, click on “Elementor Header & Footer Builder”.
 You can find the footer Elementor builder in Appearances.
 - Once you’re in the builder settings, simply click on “Add New” at the top left of the builder page.
 Click on “Add new” to add a new footer template.
 - When you’re in the template builder, just give your template a title and set the type of template as footer. Then, assign the template to the page you want, and you can even set necessary user roles to display who can and can’t see it. After all that, click on “Edit with Elementor” to edit the footer template.
 Click on “Edit with Elementor” to edit your template.
 - You’ll then be directed to the template builder where you can pretty much customize your footer to your liking. You can customize your footer by dragging widgets and by adding new template sections by clicking the “+” button.
- Finally, don’t forget to save your work by clicking on “Publish/Update” at the bottom left of the builder.
 Feel free to customize your footer the way you want.


You now have your own customized footer, with 3 ways to do it too!
Why You Might Want To Edit Your Footer
As mentioned earlier, your WordPress website’s footer can be found on all pages. So you can’t just fill this section with pointless links or the standard WordPress theme text. That’s why you should make use of your website’s footer by emphasizing important links that cannot be featured in the header.
Also, the footer provides an amazing opportunity for you to boost your business image and leave a lasting impact on your visitors. You can include your logo there along with a punchline, or a straightforward explanation of your brand that highlights what your company is about, instead of leaving this place blank or filling it with not so useful information.
Plus, from an SEO standpoint, the site’s footer is also equally important. Any links found in the footer will be treated as site-wide links because they can be found on every page of your website. And, in order to increase page authority, you should never stuff this area with keywords or internal links. Links should only be included if they are necessary or valuable to your audience.
These are simply just a few reasons why you need to tweak the footer of your WordPress website after adding a theme.
Fortunately, the majority of WordPress themes found here have footer editing capabilities built right in, so you don’t need to manually change the code in footer.php. We also don’t advise making changes straight to footer.php because if something goes wrong with the code, footer.php won’t load and your site won’t function.
Leave A Lasting Impression
Overlooking your website’s footer is one of the biggest mistakes you can make in managing your WordPress website.
Not having the necessary and useful information can make your web visitors click away and choose your competitors instead.
Luckily, editing your footer on WordPress is very easy to do.
There are three methods you can use to change your footer, and none of them will take more than a few minutes. Those few minutes to edit your footer seems like a great trade for a long-lasting impression!