Transferring web hosting is a strategic move for website owners looking to optimize their site’s performance. This article details the 9 essential steps for how to successfully manually transfer your web hosting to another web host provider. We’ll cover backups, exporting databases, and editing your website’s configuration files. We also discuss the 2 alternative methods of using website migration services and website migration plugins.
This guide is designed to help small business owners, IT professionals, and anyone with an online presence navigate the complexities of a hosting upgrade. Let’s get started!
1. Get New Web Hosting
The first step in transferring your web hosting is to get a new web hosting service. This decision must be informed by the deficiencies you’ve identified in your current host. Common deficiencies are disappointing speed performance, poor uptime, poor scalability and poor value for money.
Conduct research into potential new hosts to compare features, costs, and customer reviews. This ensures you select a new hosting provider that not only addresses the shortcomings of your current host but also aligns with your website’s evolving requirements.
Transferring to a new web host is also the perfect opportunity to evaluate whether you’re using the correct type of web hosting (shared, Virtual Private Server hosting, cloud hosting, dedicated hosting) or whether you wish to upgrade/downgrade to a type that better meets your needs. Do this by assessing your traffic volume, storage requirements and level of technical expertise.
When you have chosen your new web hosting plan and the appropriate hosting type and plan, it is time to purchase. Select the duration of the hosting plan (monthly, annually, biannually) and make payment.
2. Backup and Export Website Files
The second step is to backup and export your website files via cPanel or FTP. Use the built-in tools for this step if your current hosting provider offers cPanel.
For those without cPanel, you need to use FTP (File Transfer Protocol). FTP in the context of website migration is a protocol used to transfer files from the old server to the new server. Using FTP to manually backup and download your files takes 4 steps:
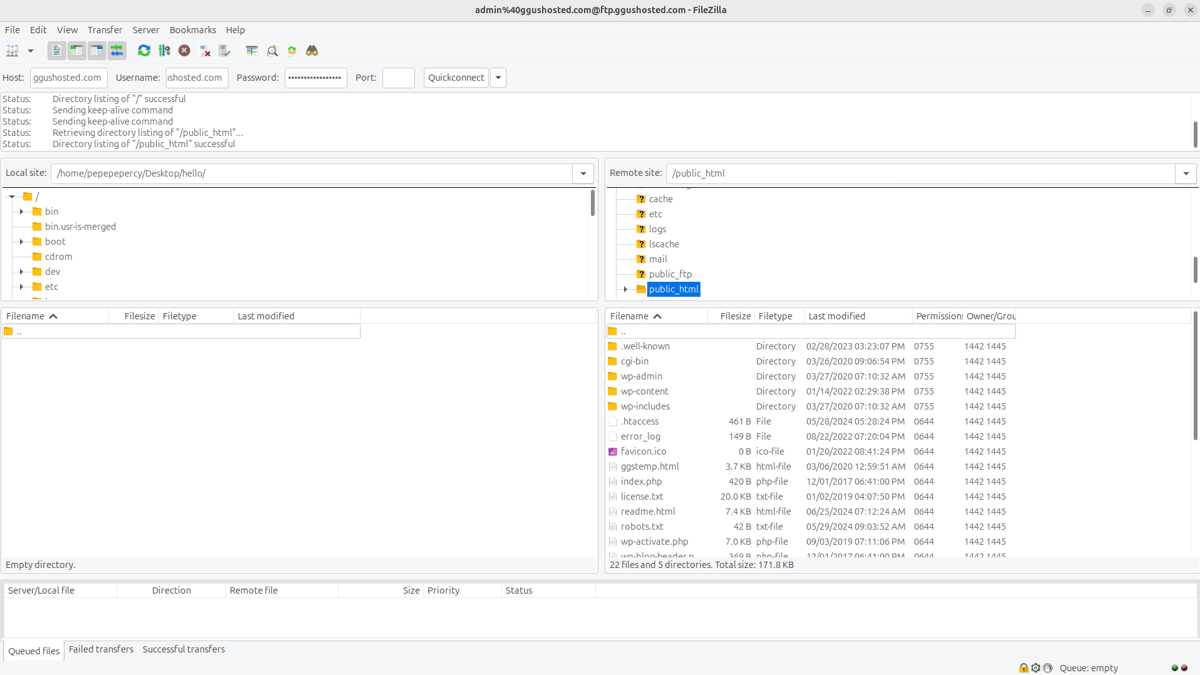
- Set up FTP client Download and install an FTP client like FileZilla. Set it up by entering your website’s domain, FTP username, and password, which you are able to get from your existing hosting provider.
- Connect to your website server Launch the FTP client and connect to your hosting account.
- Navigate to root directory Access the root directory which contains your website files.
- Download files Select all files and folders in the root directory and download them to your local computer. Ensure that you maintain the original directory structure to avoid issues when restoring the files on the new host.
Using FTP is a more time-consuming process than using cPanel (especially for larger sites), but it is a thorough method to ensure you have all your website data backed up before transferring to a new host.
3. Export Website Database
The third step is to export your website database via phpMyAdmin. Skip this step if you used cPanel to backup and export your website files, as the export already includes your database.
Otherwise, exporting your website database via phpMyAdmin takes 6 steps:
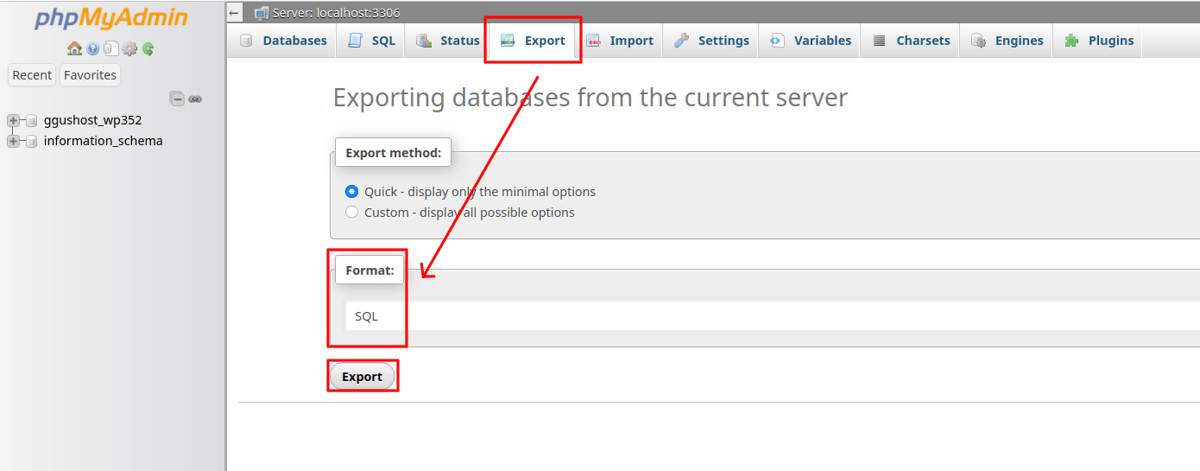
- Access phpMyAdmin Log into your hosting control panel and locate phpMyAdmin.
- Select the database Select the database that your website uses from the left sidebar.
- Export database Click on the ‘Export’ tab at the top of the page.
- Choose export method Select the ‘Quick’ method for a simple export or ‘Custom’ to specify which tables to export and other options like compression.
- Format selection Ensure that SQL is selected as the format.
- Start the export Click on the ‘Go’ button. This commences the export process and downloads the file to your computer.
Keep in mind that you need to update the database connection settings in your website’s configuration files to reflect the new database details.
4. Import Website Files
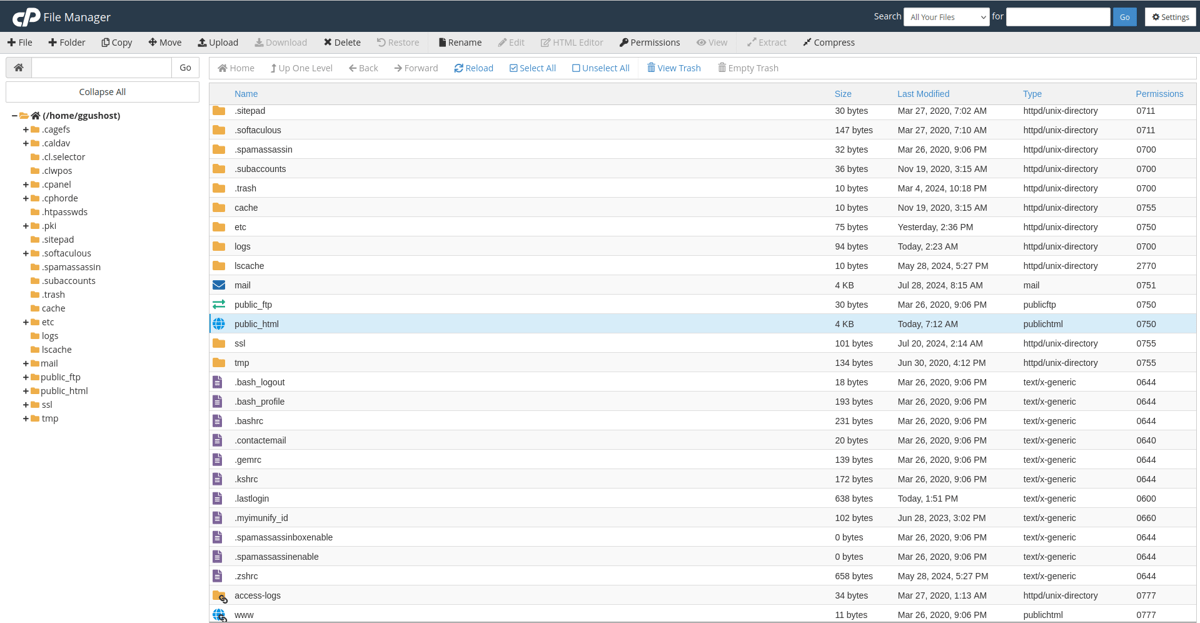
The fourth step is to import website files. This process involves using either the File Manager provided by your new hosting’s control panel or FTP.
For those using file manager, there are 4 steps. First, log in and access the control panel of your new hosting provider. Second, navigate to the File Manager tool within the control panel. Third, go to the root directory where you want to host your website. Fourth, upload your website files. Those with their files compressed (.zip file) are able to upload them directly. Once uploaded, use the ‘Extract’ function in File Manager to decompress the files in the appropriate directory.
For those using FTP, there are 3 steps. First, configure your FTP client with the connection details provided by your new hosting provider (host address, username, and password). Second, launch the FTP client and connect to your new hosting account. Third, navigate to the desired directory on the server. Upload all your website files from your local computer to the server.
Ensure that the directory structure on your new host matches the structure on your old host. This is crucial for the functionality of scripts and multimedia assets. Also check the permissions of the files and folders. Some scripts require specific permissions to run properly.
Browse your website’s files through the File Manager or FTP client after the upload to ensure all files are uploaded correctly and are in the proper directories. You also need to ensure that your website’s configuration files are updated, particularly if there are changes in paths or database connection details.
5. Create a New Database
The fifth step is to create a new database. This involves using the database management tools provided by your hosting control panel.
Creating a new database using cPanel takes 5 steps:
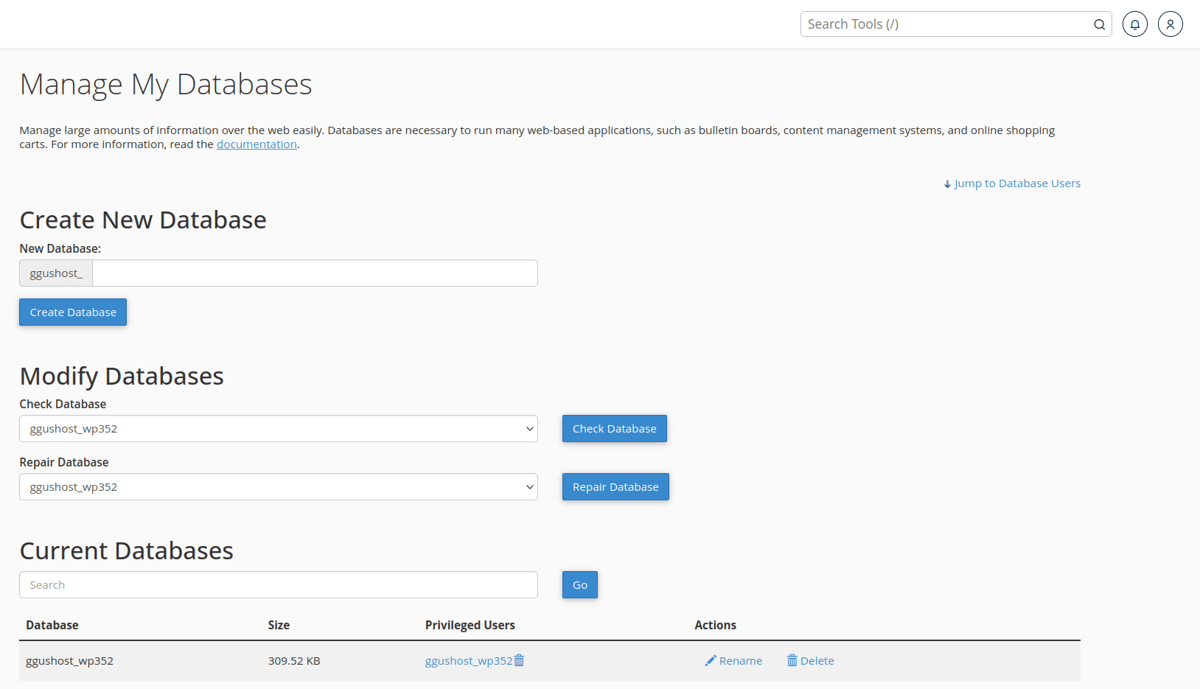
- Log into the new web host Sign into cPanel on your new hosting account.
- Navigate to MySQL database Find the MySQL Databases icon and click on it.
- Create a new database Enter a name for your new database and click ‘Create Database’. Make a note of the database name for future reference.
- Create database user Go back to the MySQL Databases page and scroll down to the ‘MySQL Users’ section. Here, create a new user by providing a username and password. Make sure to choose a strong password.
- Add user to database After creating the user, add this user to your newly created database. Set the appropriate permissions to ensure the user is able to modify the database as needed.
Creating a new database using Plesk takes 4 steps:
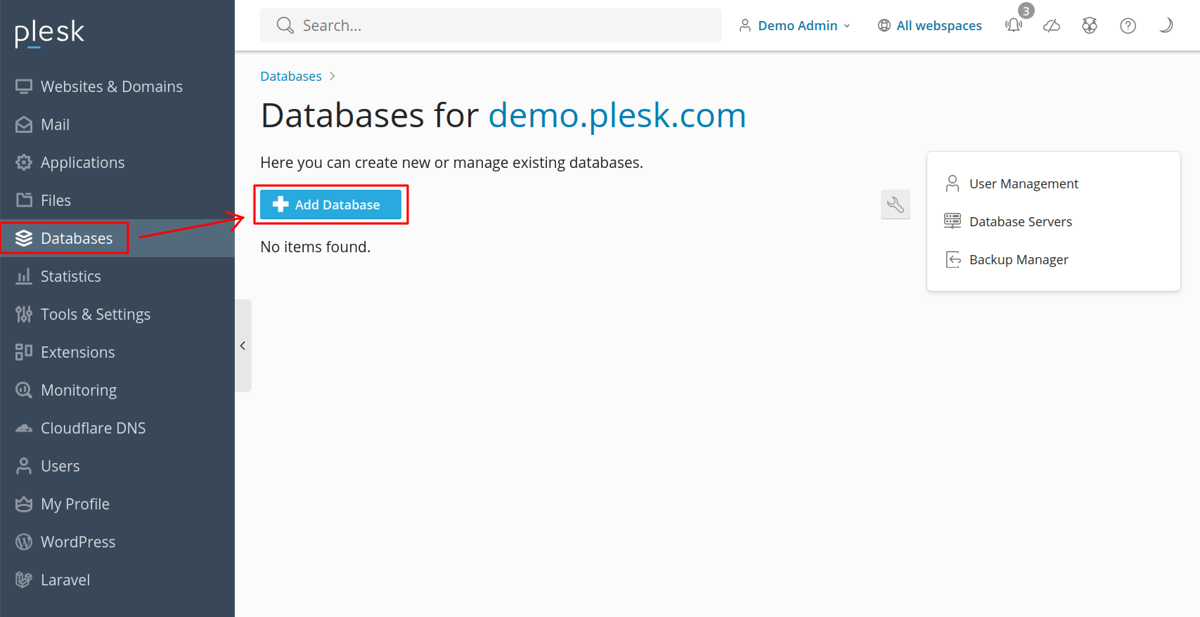
- Log into Plesk Sign into your Plesk control panel.
- Go to Database Locate the ‘Databases’ section and click on it.
- Create database Click on ‘Add Database’. Fill in the database name, and select the type of database (usually MySQL).
- Create a new database user During the database creation process, you’re also able to add a new database user. Provide the username and a strong password, and assign this user to the database.
6. Import Website Database
The sixth step is to import the website database. This involves transferring the SQL file you exported from your old host into the new database you just created. The import process is typically done using phpMyAdmin.
Importing your your database via phpMyAdmin takes 7 steps:
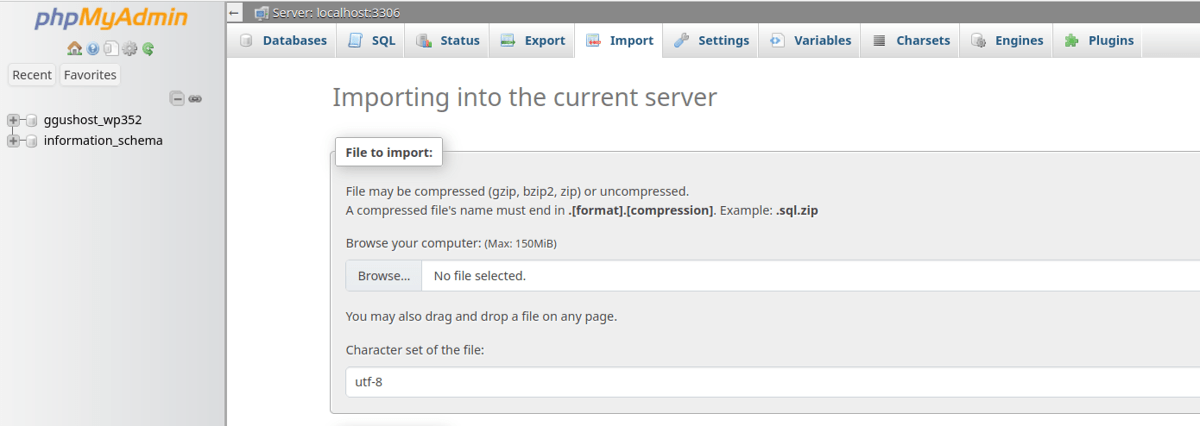
- Access phpMyAdmin Log into the control panel of your new hosting and open phpMyAdmin.
- Select your new database Click on the new database you created from the list on the left side.
- Import database With your database selected, click on the ‘Import’ tab in the top menu.
- Upload the SQL file Click on ‘Choose File’ and select the SQL file you exported earlier from your computer. Make sure the file format is SQL.
- Begin the import Click ‘Go’ at the bottom of the page to start the import process. This takes a few minutes depending on the size of your database.
- Review the data After the import completes, browse through the tables in phpMyAdmin to ensure all data appears correct and intact.
- Check for errors Keep an eye out for any error messages during the import process. Common issues relate to file sizes or server timeouts, especially with larger databases.
7. Edit the Website Configuration Files
The seventh step is to edit the website configuration files. It’s crucial to update the wp-config.php file with the new database details to ensure your site connects properly to the new database. Updating the wp-config.php file takes 4 steps:
- Access File Manager Log into your new hosting account and open cPanel. Navigate to Files → File Manager.
- Locate wp-config.php In the File Manager, go to the public_html folder. Find the wp-config.php file, right-click on it, and select ‘Edit’.
- Update database information
In the editor, locate the following lines and update them with your new database details:
define(‘DB_NAME’, ‘new_database_name’); /** Replace ‘new_database_name’ with the name of your new database. */
define(‘DB_USER’, ‘new_database_username’); /** Replace ‘new_database_username’ with your new database username. */
define(‘DB_PASSWORD’, ‘new_database_password’); /** Replace ‘new_database_password’ with your new database password. */
define(‘DB_HOST’, ‘localhost’); /** This typically remains ‘localhost’ but sometimes needs to be updated depending on your new hosting provider. */ - Save and close After making the changes, save the file and close the editor.
8. Test Your Website
The eighth step is to test your website. It’s important to thoroughly test your website to ensure everything operates as expected. There are six things to check.
Firstly, verify basic functionality by ensuring the homepage loads correctly, navigation links direct properly, and media files display correctly. Secondly, test interactive features by submitting entries on forms, performing login and logout tests, and conducting eCommerce transactions. Thirdly, conduct responsive and cross-browser testing to ensure the website works seamlessly across different devices like smartphones, tablets, and desktops and browsers like Chrome, Firefox, Safari, and Edge. Fourthly, perform performance checks using Google PageSpeed Insights to assess loading speeds and identify performance issues, and verify that all SEO and analytics tracking codes are active. Fifthly, check security measures by confirming the activation of your SSL certificate for HTTPS access and checking that backup systems are configured correctly. Lastly, review server and application error logs.
Regular monitoring post-launch is also advised to catch any subsequent issues early.
9. Update DNS
The ninth and final step in transferring your web hosting is to update the Domain Name System (DNS) nameservers. DNS nameservers are servers that direct internet traffic to the specific servers that host website data. This update ensures that your domain points to the new hosting provider.
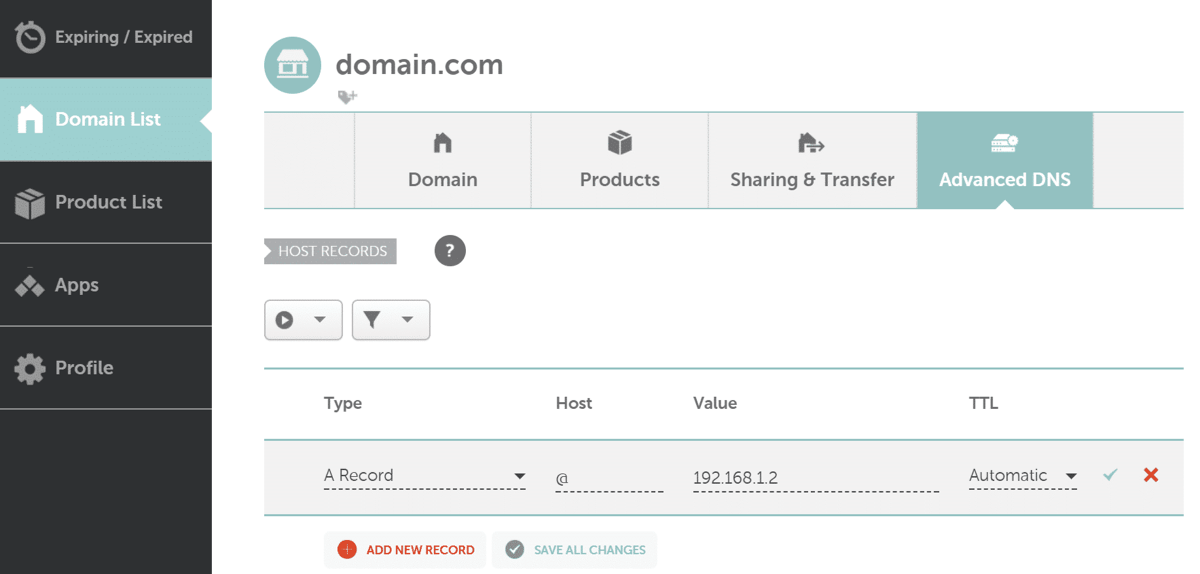
Updating DNS takes 7 steps:
- Obtain nameservers Get the nameserver details from your new hosting provider. These are typically provided in your hosting welcome email or found in your hosting control panel.
- Access domain registrar Log into the account at your domain registrar (aka the company where you registered your domain name).
- Navigate to DNS settings Locate the DNS settings or Domain Management area. This section is commonly labeled as ‘Nameservers’, ‘DNS’, or ‘Domain Name Servers’.
- Update nameservers Remove the old nameserver entries and enter the new ones provided by your new hosting provider.
- Save changes Ensure you save or confirm the changes. Check if there are any additional steps required by your registrar to finalize the changes.
- Wait for propagation Allot 24 to 48 hours for these changes to propagate across the internet. Expect your site to be intermittently available via the old and new host during this time.
- Verify the update Confirm that your domain is pointing to the new host using tools like nslookup or dig to check the nameserver records. Accessing your domain in a web browser must show that it is loading from the new hosting environment if the update is successful.
Remember to monitor your site closely for any issues in the days following this change.
What Are Other Ways to Transfer Web Hosting?
There are 2 other ways to transfer web hosting: via web hosting with migration services, or using a website migration plugin (WordPress websites only).
Web Hosting With Website Migration Services
Many web hosting providers offer website migration services, typically free of charge. This means you’re able to request that your new host handle the transfer of your website to their hosting. The service is managed by their team of professionals to ensure minimal downtime and a seamless transition.
Which Web Host Offers Free Website Migration?
Two web hosts that offer free website migration are Hostinger and TMDHosting. Hostinger offers complimentary migrations overseen by their dedicated website migration team. You are entitled to migrate the same number of websites that are supported by your chosen Hostinger plan. TMDHosting offers complimentary migration services with minimal downtime for all of their plans.
Website Migration Plugin
A website migration plugin simplifies the process of moving a WordPress site from one hosting environment to another. These plugins function as tools within the WordPress interface that package your entire site (including databases, files, and configurations) into one file. This file is then easily imported to a new hosting environment without the need for manual database manipulation. Popular plugins include Duplicator, All-in-One WP Migration, and WP Migrate DB. Learn more about the process of migrating WordPress websites in our guide.
When Should I Change to a New Web Host?
You should change your web host in two scenarios.
The first is if your website frequently experiences slow load times and excessive downtime despite ongoing support efforts. Evaluate your site’s performance by using tools like our Bitcatcha Server Speed Checker to check if your site returns a slow global average server response time (greater than 500 ms). This is a clear indication to look for a new hosting provider that offers better performance.
The second is if your current hosting plan no longer meets the traffic demands or storage needs of your website. Telling signs include your website beginning to perform poorly during peak traffic times, or frequently encountering storage capacity warnings. Switch to a new host if your current provider is unable to provide scalable options or the upgrade costs are prohibitive.
How Do I Choose My New Web Host?
You choose your new web host by making sure they are able to meet 10 important criteria. The first is high-quality SSD (Solid State Drive) storage. The second is generous bandwidth. The third is a free domain name. The fourth is support for multiple domains. The fifth is fast server speeds. The sixth is a 99.9% uptime guarantee. The seventh is multiple data center locations. The eighth is a beginner-friendly control panel. The ninth is robust free security features to protect your site. The tenth is 24/7 customer support. We explain the details of these criteria for a fantastic web host in our guide to the best hosting brands.


